Saturday, May 2, 2020

Abigail's Blanket


ABIGAIL'S BLANKIE


   I've been off the crochet design scene for quite some time. Life has been busy for me, there have been some twists and turns, and anytime I had to craft was spent crocheting and knitting for my sanity and family, but I haven't had the time or desire to design because life had been so full. I had been homeschooling while working, and then a few years ago my husbands health began to deteriorate. Besides having diabetes, within the past three years he has had three heart attacks and three stents put in, and has been diagnosed with stage four lung cancer, end stage kidney disease, and COPD. His health is stabilized for the time being, and for that I am grateful. But, I have been preoccupied, and will continue to be. Throughout these past few years, sadly, sometimes my followers did not get helped when they had a question. With that said, I will try to stay on top of incoming comments and questions, but I cannot promise anything other than I will try my best. I am sure you will understand. 
  With all that said, last week it was about time I made a big girl blanket for my granddaughter. First thing was finding the yarn. Once I found the yarn I wanted to use, finding the pattern was the next step. I was interested in making the Hugs and Kisses blanket for her, but I was not able to use the pattern because it is a baby blanket pattern and I wanted to make her a big girl blanket. I also intended to double strand the DK weight yarn I chose, because I love the beautiful color transitions this method creates when you begin crocheting by staggering one of the skeins a bit at first. So, because of these two reasons, I had to set out and create my own similar version, and so here it is.     
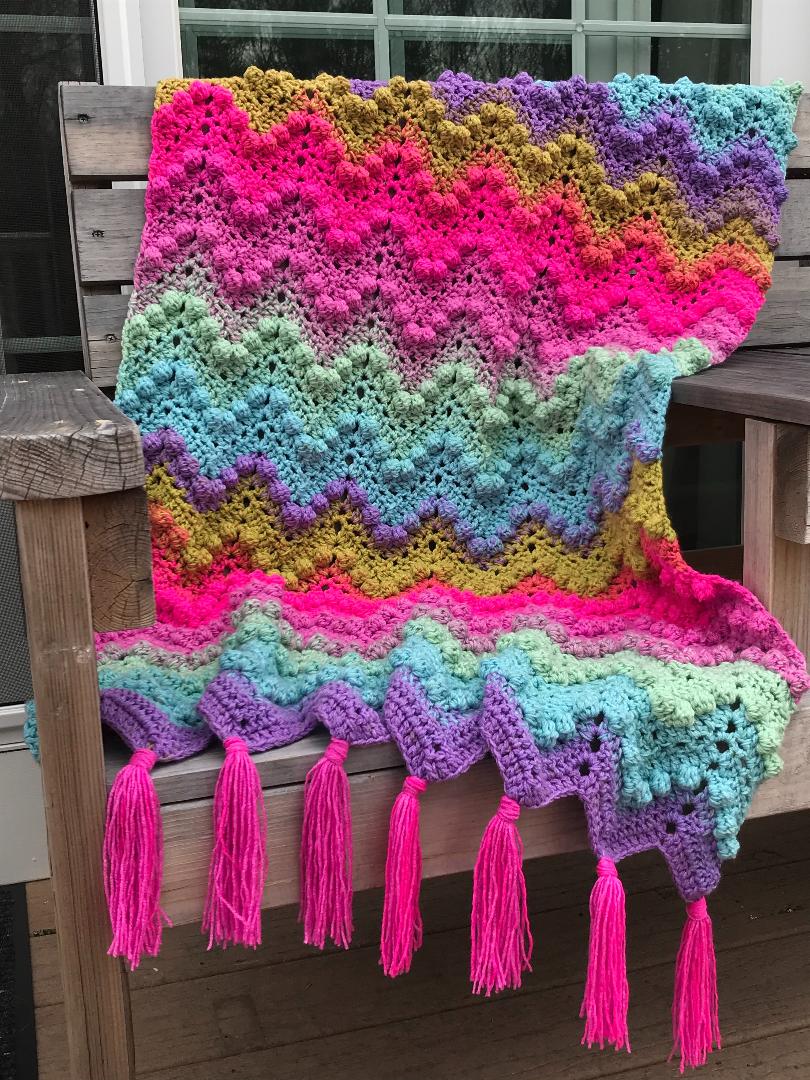
   Abigail's Blanket is created using Lion Brand's Cupcake yarn in the color Balloon and an I hook, and, again, using two strands at one time. Instead of grabbing both skeins and starting off right away, I cut away perhaps 1/4 of the beginning color from one of the skiens, and then I began crocheting. Doing this causes the color changes to go from say two strands of pink to one strand of pink and one strand of orange, and then to two strands of orange. You don't want both strands to change color at the same time.  This blanket used four full skeins, and a half of two skeins and measures 29 1/2" x 40". I began with chaining 136, but you may create any sized blanket you wish by using any sized yarn with a corresponding hook size and starting the beginning chain in any multiple of 19 plus 3 more chains. (Example: 19x7=133+3=136)


ABIGAIL'S BLANKET
by Vicki Plunkett

STUFFS TO KNOW:
  • Chain in multiples of 19 plus 3 to begin
  • If using the double stranded method using DK weight yarn and a J hook, each repeat of 19 stitches = approximately 4 1/4"
  • After crocheting in a ch-2 or ch-3 space, always skip the "hidden stitch", or the first stitch after it. 
  • Double crochet two together (dc2tog):  (YO, insert hook in next stitch, yo, draw yarn through st, yo, draw yarn through 2 loops on hook) twice, yo, draw yarn through 3 loops on hook.
  • Half-double crochet two together (hdc2tog):  YO, insert hook in next stitch, yo, draw yarn through stitch, insert hook in next stitch, yo, draw yarn through stitch, yo, draw yarn through 4 stitches.
  • Bobble stitch: (Yarn over, insert hook in next stitch, yo, pull up a loop, yo, pull through two loops) 5x in same stitch, yo, and draw through all 6 loops on hook. .


LET's BEGIN!

Begin chaining in multiples of 19+3 to desired length.
Row 1: Dc in 4th ch from hook, *dc in next 7 ch, (dc, ch3, dc) in next ch, dc in next 7 ch, ** work dc2tog working first half in next ch, sk 2, work second half in next ch, yo, draw through 3 loops on hook, repeat from * across ending at **, work dc2tog working first half in next ch, sk next ch, work second half in last ch, yo, draw through 3 loops on hook, turn.

Row 2: Ch 3, sk first 2 sts, dc in next 7, *(2 dc, ch 3, 2 dc) in ch sp, dc in next 6 st, **dc2tog working first half in next st, sk3, work second half in next st, yo, draw through 3 loops on hook, dc in next 6 st, repeat from * across ending at **, dc2tog in next st & 3rd ch in turning ch, turn.

Row 3: Repeat row 2

Row 4: Ch 2, sk first 2 st, hdc in next, *(bobble, 2 hdc) 2x, bobble, (2 hdc, ch 2, 2 hdc) in ch sp, (bobble, 2 hdc) 2x, bobble, ** (hdc2tog working first half in next ch, sk 1, work second half in next st, yo, draw through 4 loops on hook, repeat from * across ending at**, hdc2tog over next two st, turn.

Row 5: Ch 3, sk 2, dc in next 7, *(2 dc, ch 3, 2 dc) in ch sp, dc in next 6, ** dc2tog working first half in next st, sk4, work second half in next st, yo, draw through 3 loops on hook, dc in next 6, repeat from * across ending at **, dc2tog working first half in next st, sk 2, work second half in next st, yo, draw through all 3 loops, turn.

Row 6: Ch 2, sk 2, *(hdc, ch 1, sk 1) 4x, (hdc, ch 2, hdc) in ch sp, ch 1, (hdc in next, ch1, sk 1) 3x,
hdc, hdc2tog working first half in next st, sk 1, work second half in next st, yo, draw through all 4 loops, turn. 

Row 7: Ch 3,sk ch sp, dc in hdc, *(2 dc in next ch sp) 3x, (2 dc, ch 3,2 dc) in next ch sp, (2dc in next ch sp) 3x,** dc2tog working first half in actual stich of the next ch 1 not just the ch 1 sp, sk next 4 sts, work second half in next hdc, yo, draw through all 3 loops, repeat from * across ending at **, dc2tog working first half in next actual st of the next ch 1 not just the ch 1 sp, sk 1, work second half in next st, yo, draw through all 3 loops, turn.

Continue on repeating rows 4-7 until pattern is about an inch shy of the desired length at row 4. Then, repeat row 5 three times. Weave in ends. Make and attach tassels to one or both ends of blanket.


Have a LOVEly day!
Love all you do and those you have, with all your heart.


Friday, June 2, 2017

Autumn is in full swing here is Rhode Island, and although I don't live near the shore, there is plenty of eye candy to experience these past few weeks.

Monday, February 3, 2014

2013 TOP BLOGGER


 I have recently received the honor of having one of the top 100 most popular crochet patterns on ALLFREECROCHET! 
...And I am more than thrilled!!!!!!!!!
Thank you everyone for making this possible!


Have a LOVEly day!

Love all you do, and those you have, with all your heart!


Tuesday, June 18, 2013

Country Coverlet


Country Coverlet


 "A Pineapple?" Yes, a pineapple.


This Country Coverlet is my full-sized version of my 
"Heirloom Coverlet for Baby" 
(Seen below)


My "Country Coverlet" needed a special touch for its beginnings. Because the center needed to be rather large, and I could not duplicate the center of the baby blanket to the extent and size needed for this blanket, I thought on what else to put in the center. I thought back to a pineapple sketch I had designed a while back and decided it finally found it's calling. 

So, again, why the pineapple? Well, at one time, in the Caribbean, Europe, and North America, the pineapple came to be associated with the return of ships from extended voyages. Consequently, it became an emblem of welcome and warmth and hospitality that made its way into contemporary art and has stayed there. 

When I thought of this blanket completed, I easily imagined one of its uses as a warm, welcoming center piece to be displayed upon guest beds in people's homes as well as at Bed and Breakfast's. 

This afghan is only partially complete right now. Presently it sits atop a queen sized bed, and when completed, the cabled edges will reach the edges of the bed, followed by 6-8" of draping shells that will fall along three sides of the bed. 

What can you envision in the center of your blanket?!

***********************************************************

Have a LOVEly day!

Love all you do, and those you have, with all your heart!


Sunday, June 16, 2013

The Linked Stitch


 Originally from an article from Crochet Me, I decided I really had to try this new stitch I had never seen before. And as always, I just had to share it on my Facebook page. 

   Well, the link would not work once I put it on my Facebook, but I really needed to save the information for a clear reminder about it, as well as a later time when I had time to sit and work it and think about it and all its wonderful possibilities. So, here it is. The info from the article, all the way down to the last bit of advertisement info for purchasing the magazine, Interweave Crochet, where it was first introduced.


I am always on the lookout for a quick and easy stitch. In last winter's issue of Interweave Crochet I was reintroduced to the linked crochet stitch. This is easily one of my favorite stitches. Fast and simple, the linked crochet stitch combines the speed and height of taller stitches, such as the double or triple crochet, with the solid fabric generally associated with single crochet.

With each issue of Interweave Crochet, I look forward to the in-depth how-to technique articles, the innovative crochet patterns, the quick and easy accessories, and so much more. Sometimes the stitches or techniques are brand new to me, and sometimes they are a pleasant reminder of what can be accomplished with crochet.

Here is great introduction to linked crochet:

Spacer 10x10 pixels Spacer 10x10 pixels
Linked Double Crochet Step 1 Work the beginning chain as normal. Work the first row of stitches by inserting your hook in the second chain from the hook, yarn over and pull up a loop. The loop you have just pulled up takes the place of the yarnover in a regular double crochet but does not create the "space" normally associated with a yarnover.
Spacer 10x10 pixels
Linked Double Crochet Step 2 Insert your hook in the next foundation chain, yarn over and pull up a loop. You will now have three loops on your hook, just as you would for a normal double crochet. 
Spacer 10x10 pixels
Linked Double Crochet Step 3 To finish the stitch, simply work as you would a normal double crochet, yarn over and draw through two loops twice. Notice the horizontal bar created on the post of the stitch.
Spacer 10x10 pixels
Linked Double Crochet Step 4 To work subsequent linked double crochets, insert your hook from top to bottom behind the horizontal bar on the post of the stitch you just worked. This horizontal bar runs parallel to the front loop at the top of the stitch. Yarn over and pull up a loop through the bar. Insert your hook in the next chain; yarn over and pull up a loop. Work these loops off as before. Repeat this stitch to the end of the row. 
Spacer 10x10 pixels
Linked Double Crochet Step 5
For successive rows, chain two to equal the height of the double crochet row, insert your hook in the second chain and pull up a loop. Insert your hook in the next stitch as usual, and work the loops off of the hook as before. Work the remainder of the row as above.

Spacer 10x10 pixels
Spacer 10x10 pixels
Linked Double Crochet
Spacer 10x10 pixels
Spacer 10x10 pixels
See, it's easy! Notice how the fabric is solid, without the tiny gaps between stitches, making it perfect for quick projects. As your piece gets bigger, you will really begin to notice the gorgeous drape as well.

You can experiment with inserting a row of lacier stitches between the linked stitches rows.

Spacer 10x10 pixels

Subscribe to Interweave Crochet (or any one of our other wonderful magazines!) today at a fabulous limited time sale price and begin exploring a variety of helpful techniques and stitches as well as other valuable articles and extraordinary patterns in Tunisian crochet, lace, linked crochet, and more to expand your skills.


   Have a LOVEly day!
 Love all you do, and those you have, with all your heart!


Friday, March 1, 2013

Sun Catcher Dish Cloth


Sun Catcher Dish Cloth


These dainty, bright, detailed dish cloths work up quickly and beautifully when using both acrylic or cotton yarns. 


Acrylic yarns create durable cloths with superior scrub-ability, while cotton cloths can be doubled as face cloths as well, adding an element of simple elegance or  sunshiny fun!

  These cloths are created using size I hooks and medium worsted weight acrylic yarn or
cotton yarn with their corresponding size hooks.


Note: Joins are worked with slip stitches in top of first stitch of each round.
 Be sure to count the number of stitches at the end of the rows.


 Lets Begin!


1. In magic circle, work 7 sc. Join with slip stich to top of 1st sc.
2. ch1, work 2 sc in same sp & each sc around. join. (14 sc)
3. ch3 (counts as 1 hdc and 1 ch st for this round), hdc in same sp, [ch 1, sk1 sc, (hdc,ch1,hdc) in next sc]6x, ch 1, join.(14  ch-1 sps & 14 hdc)
4. ch1, 2sc in same sp, sc in next st, *2sc in next stitch, 1 sc in next 2 stitches, repeat from * around. Join. (36 sc)
5. ch4 (counts as 1 dc & 1 ch-1 sp), dc in same sp, * sk 1 sc, (dc, ch1, dc) in next sc, repeat from * around. Join to 3rd chain of beg. ch-4. (18 ch-1 sps)
6. ch1, sc in same sp, sc in ch-1 sp, *2sc in next stitch, sc in next 4 sts, repeat from * around, ending w 2 sc in 2nd to last stitch of row. Join to 1st sc. (64 sc)
7. ch1, sc in same sp, (ch3, sk 1 sc, sc in next sc) around. Join to 1st sc. (32 ch-3 sps)
8. sl st 1X to land in ch-3 sp, ch4, dc in same sp, * (dc, ch2, dc) in next ch-3 sp, repeat from * around.(32 ch-2 sps)
9. ch 1, *sc in next ch-2 sp, ch3, sc in same sp, repeat from * around. Finish off, and weave in ends. 
                                                                                   C@2010


Have a LOVEly day!

Love all you do, and those you have, with all your heart!


Thursday, February 7, 2013

Cross Bookmark

Cross Bookmark


   This pattern was re-created by me for my friend, Galye. One day at our crochet group at our church, Gayle brought in a lovely cross bookmark she had found in her Grandmothers Bible, wanting to know if I knew where I could find the pattern. I searched high and low on the internet for such a pattern and could not find one for free-or otherwise-anywhere. So, I  re-created the pattern. We were looking to make these bookmarks for a seminar we will be holding at our church in the spring, and because I could not even find an image of the pattern anywhere for sale, I went ahead, made the pattern, and am posting it here for free for those of you who would make these bookmarks for gifts or for yourself, but not for sale. I am unsure of the origin of the pattern, although I know it is a very old, traditional item to be crocheted, and the pattern most likely is not bound by any copyright.


Special Stitches 

Shell: (3 dc, ch2, 3 dc) in space indicated
Picot: (sc, ch2, sl st in 1st ch, sc) in stitch indicated

Special Pattern Works:

Ending Row: turn, ch 6, sc in ch-2 of shell, ch 5, join to 3rd ch og beginning turn ch 3 of previous row.
Outer Corner Boarder: In the ch 6 sp work: 2 sc, picot IN the 3rd st of the ch 6-sp, then 3 more sc in the same ch-6 sp, picot in the sc.
  Then, in the ch-5 sp work: 3 sc, picot in the 3rd ch of the ch-5 sp, then 2 more sc in the ch-5 sp.


LETS BEGIN!


My second trial cross as I wrote out the pattern. There are errors in it, such as it is missing one picot stitch on the lower right portion of the cross-duh me! And half of the picots are actually ch-2's until I remembered they were supposed to be picot stitches-double duh! But, this is a more accurate photo than the above one, to get an idea of what you are making. Lord willing, tomorrow there will be a perfectly formed, lovely picture in the place of these two somewhat amature-ish, less than perfect ones here now.

***Note-I used size 3 crochet cotton thread and a size 0 hook to produce the above two bookmarks. They are a bit too large. therefore I recommend using a thinner thread and smaller hook. Once I have the opportunity to use smaller thread and hook, I will update with more pertinent information. But, if you crochet & have thread, have fun!!!

Top Portion of the Cross
1. (RS) Ch4, join w/ sl st to 1st ch (circle formed), ch 3, (2dc, ch 2, 3 dc) in center of circle.
2. Turn, ch 3, shell in ch-2 sp, dc in 3rd ch of turning ch.
3-4. Repeat row 2
5. Work "Ending Row". Finish off.

Bottom Portion of Cross
1. RS facing, join thread to last of row, ch3 shell in row 1 beginning circle, dc in 3rd ch of beginning ch-3 of row 1.
2. Turn, ch3, shell in ch-2 sp, dc in 3rd ch of turning ch.
3-7. Repeat row 2.
8. Work "Ending Row". Finish off.

Right Arm of Cross
1. RS facing, join in to the last dc in row 2 of the bottom portion of the cross, ch1, shell in space between beginning rows 1 & 1 of top & bottom portions, sl st in last dc of row 2 of top portion of cross.
2. Turn, ch3, shell in ch-2 sp, dc in 1st dc of row 1
3. Turn, ch3, shell in ch-2 sp, dc in 3rd ch of turning ch-3
4. Work "Ending Row". Finish off.

Left Arm of Cross
1. RS facing, join into the last dc of row 2 of top portion of the cross, ch 1,shell into the sp created between rows 1&1 of top and bottom portions, ch 1, sl st in last dc of row 2 of bottom portion.
2. Turn, ch 3, shell in ch-2 sp, dc in  joining st of row 1
3. Turn, ch 3, shell in ch-2 sp, dc in 3rd ch of turning ch-3 of row 3.
4 Work "Ending Row". DO NOT finish off.

Border
Ch 1.
*In next st that "Connects" the outer perimeter stitch to the shell work "Picot", 2 sc in ch-3 sp, picot in "connecting" stitch, 2 sc in ch-3 sp, sc in corner st, [2sc in ch-3 sp, picot in "connecting" stitch] 2x, work "Outer Corner Boarder" 
Repeat from * 1x as written.
Repeat from * again, 2 more times following the same principal of the pattern, making the needed adjustments in the patterned stitch count in order to cover the entire perimeter of the lower arm of the cross.
End with the final working of the "Corner Boarder",  join w/ sl st, finish off. 
Weave in any ends not crocheted over as you worked your piece.

Cut a separate piece of thread 18" long, knot two loose ends together & attach to top of cross in center of picot stitch. Add tassel or beads or charm if desired to the end.


   Have a LOVEly day!
Love all you do, and those you have, with all your heart!


Wednesday, June 6, 2012

Maahvelous Marinade

       This sweet, tangy marinade I made special for a top round roast I cut up for grilling a few weeks ago.  I normally don't do steaks, let alone grilling them, but since making this recipe the first time, I have made it a few more times and decided I need to try to save it before I forget it. That's the hard part. When you're just throwing everything together, its much easier than measuring it all out. Therefore, as I go along, this recipe will probably have adjustments made, but at least I have the basic here for now. I hope you enjoy it. We sure do!!


Maahvelous Steak Marinade


2-3 lbs steak or sliced roast of your choice
1 large onion
1 1/2 c tomato ketchup
1 c Soy sauce
1/4 c balsamic vinegar
1 Tbsp roasted sesame oil
1/2 Tbsp white vinegar
1/2 c honey
3 cloves pressed and chopped fresh garlic
1/2 c sugar

 Chop onion. In large bowl or container, layer steaks and onions. Set aside.
In small  sauce pan, combine rest of ingredients and cook over medium heat until sugar is dissolved. Pour over steaks, carefully lifting steaks with fork to run marinade throughout between the pieces and under the bottom ones placed in bowl. Cover and refrigerate for at least 8 hours or for desired length of time. Grill as usual. Enjoy!!!!!


Wednesday, May 23, 2012

Ten-Point Trivet Pattern

Well, hello!!!!

Yup, I'm at it again: It is late, everyone is asleep, and I am up on this thing I call my mock newborn-my newest sleep deprivation instrument in my life. Can you relate?

 I really don't know why I am up doing this, other than I really really really want to share this striking pattern a dear woman I met on Facebook has posted in her blog.

Up till 4 am last night with my youngest daughter throwing up for five hours strait, I woke up late this morning, groggy, tired, and disoriented for most of the day. Then I ended up missing church and spending the entire night de-cluttering and re-organizing my homeschool/craft room-something which I had begun the day before and planned on doing earlier in the day, but couldn't due to brain malfunction. I needed to finish it up before it drove me absolutely crazy.

So, It's now 2 am.
 Why am I up still???

 One of my lovely sons, (no really, he is-they all are) having been out all day with his brother working on our "new" work/plow truck, came home from working, showered, went to church, hung out there for two hours working on a sermon with the youth pastor, went out for D&D coffee, came home, took his girlfriend home a while later, came home again, and then decided he needed to do a load of wash so he would have clean clothes for the morning when he goes out painting which he just found out about he was doing.
Really???

 (Calgon, take me away!!)

 Seeing he had been up for 21 hours already, and had to get up early tomorrow morning, I sent him to bed and told him I would wait out the dryer to finish before I went to sleep. 

Never trust those dryers-they just can't be trusted, you know.

 Well, the dryer has finished, and just as it does, I find the pattern for this beautiful thing I've been eyeballing for a while.

So, what do I do?
Certainly NOT go to sleep.
No, I get on my FB page, post this pattern, and then continue to go to my blog here, and do the same.

And of course, being half delusional as I am right now, what do I do? Just what I'm doing-chatting nonesense in the midst of this blog making you wonder why you are even reading this in the first place.
 (I promise you, I wont do this again -writters block certainly has no hold on me tonight!)

So, with no further a-do (Yay!!!!!) and so I can get some sleep finally, (double yay!!!) here it is:


Wasn't it worth the wait reading all that nothingness???? 
 (This is where you are supposed to say "yes!")

This Ten-Point Trivet pattern comes with a few variations, and is simply a stunning piece.
Wouldn't you agree?
(Again, this is where you are supposed to say "Yes!")

A wonderful pattern to make in festive colors to compliment all your holiday and special entertaining!

Well, enough said! I am off to dreamland for a few hours!
YAY! YAY! YAY!


 Have a LOVEly day!
Love all you do, and those you have, with all your heart!


Monday, May 21, 2012

Flowers for a Day


 In celebration of changing the look on my blog, I decided to post a few pictures that would brighten my already bright new color scheme:
Crisp, clean, and fresh.


The beauty and wisdom of God's handiwork never ceases to amaze me!


*******************************************

 Have a LOVEly day!
Love all you do, and those you have, with all your heart!