

I am going to show you how to begin a half double crochet or double crochet row WITHOUT leaving a gaping hole at the beginning of the row!

Do these first two photos look familiar to you? If you have ever worked a double crochet or half double crochet creating a flat piece of fabric, then they must. Between the beginning chains and the first stitch you see that all-too familiar ugly "hole".
I had decided I definitely did not like that amateurish look on my otherwise neat looking items I made.
So, what did I do?
I realized to fill in that gap area, all I needed to do was dc or hdc 2 together at the beginning of the row, and that ugly gaping hole would be gone!
No extra stitches on each row to contend with, no ugliness, and no flimspy edges!
Don't know how to work a crochet 2 together? Have no fear-I will show you how to here!
We will work on a half-double crochet 2 together first:

Chain 2.
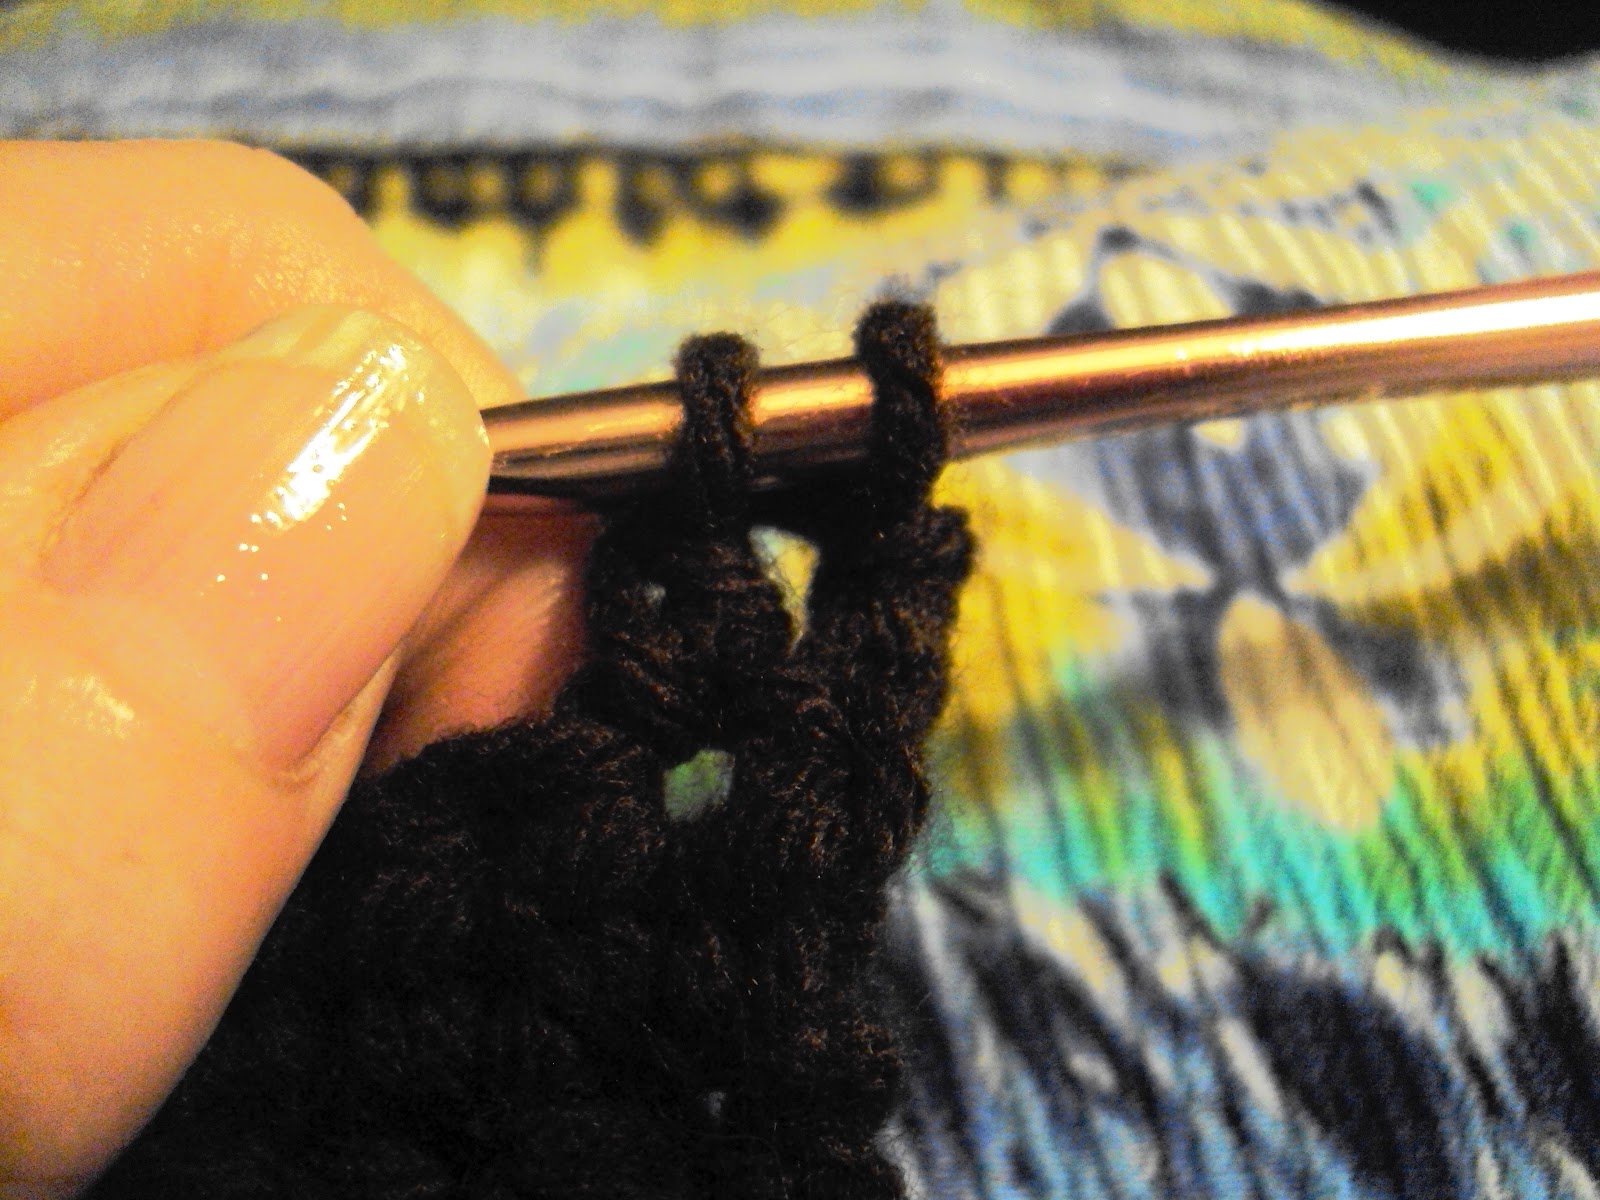
See that first "hole" to the left of the chain? THAT is the hole you will begin your stitch in. The rules of crochet is that normally it is the next hole over that you begin stitching your HDC in, but not this time!

Yarn over.

Insert hook into that first space, grab the yarn, and pull it back through the space.

You should now have three loops on your hook.

Now insert your hook into the next space, grab the yarn with the hook, and pull through the space.

You should now have four loops on your hook.

Yarn over, and pull through all four loops at once.

This is what your hdc2together should look like.
This photo shows the hdc2 together beginning a row.

| ||
| This photo shows the traditional way of starting a new row with hdc. |
Can you notice the difference?
Its not that much of a difference with the half double crochet, but wait till you see it worked with a double crochet!
So, lets work on the double crochet 2 together now!

So, as with a double crochet, we begin by chaining 3.

Yarn over.

And just as we did with the hdc, insert the hook into the FIRST space, unlike traditional crochet methods.

Grab the yarn, and pull it through the space.

You should now have three loops on your hook.

Just as working a double crochet, yarn over, and pull through the FIRST TWO loops.
You should now have two loops remaining on your hook.

Yarn over, insert hook into the NEXT space, yarn over again, and pull yarn through.

You should now have four loops on your hook.

Yarn over, and pull through two loops.

You now have three loops on your hook.
Yarn over, and pull through all three loops on your hook.

Your work should now look like this.
This photo shows the dc2 together beginning a row.

This photo shows the traditional way of starting a new row with double crochet.
BIG DIFFERENCE!!!!

So there you have it!
A new and improved way to start your rows on most of your basic, flat pieced projects! Perfect!
********************************************
Have a LOVEly day everyone!
Love all you do, and those you have, with all your heart!
23 comments:
Finally! Been wondering about that. Thank you!!!
Oh wow....thanks SO much for that hint. It makes me crazy to see an otherwise perfect project end up looking less than beautiful. I am definitely gonna start doing this IMMEDIATELY! Thanks again!!! :)
Cool beans! I'll have to give that a try! Thank you!!!
wow that's so great to know .... thanks for posting this for all of us...... I will use this on the next project......
I am working on a project no. Can't wait to start the next so I can use this technique. Thanks for sharing.
Oh mu gosh, this is something that has bugged me for so long ...Thanks for sharing!!
Wonderful improvement. Thank you so much for sharing.
I've only crocheted to put projects together as I'm a knitter. When I found the Mermaid Cuddle with alligator stitch I had to teach myself crocheting. While practicing I was baffeled by that hole so I began filling it with the appropriat ch, hdc, etc. I've been doing it your way ever since. Thanks for letting me be sure it isn't a defect to do it.
This is great! Whenever I make a crocheted towel topper there is always those big holes on the ends of each row. I never knew what to do to eliminate them. This is a very clever way to do that. Thanks so much.
Could you make this into a video or a pdf download? This is awesome!!
Thank you so much for sharing this awesome tip. Joanna
Thank you so much! As a newcomer to crochet, I thought I was doing something wrong with all the unsightly holes down the sides of my work. I will go try it now.
Just taught myself to crochet last Fall. Made a lot of scarfs since then but they all had that "hole"....thought it was just me! Thanks for this hint! Will be trying soon!
Cindy, NH
Thank you so much for this incredibly helpful piece of information.
Awesome, saw this on a crochet group on fbook and, yeah I did wonder about that, but sometimes it looks pretty, but when you want that really tidy looking edge, well now we can all do it, just like that! Thank you so much for sharing :)
I just love the results. Thank you so much
Thank you for your expertise!!!!
Thanks for your guidance.
Thankyou for the instructions. You showed me quite a few times but you didn't know that. I just wanted to be sure I was making the hdc right.
At long last, I have tried so many tips and Happy Days I came across this amazing tip, it is great to look at my crochet as see NO HOLES. Would I do the same sort of thing for a single crochet sweater sides.
Thank you for sharing this with us. The Very Best to YOu.
Great! Now how do I keep my flat work from curling up on the corners?????
This is great, thanks for sharing. I've seen various methods for doing this but this one is definitely the best
This looks good, but don't you get an extra stitch when you go into the first stitch instead of the second? How do you compensate for that?
Post a Comment